Monday, December 13, 2010

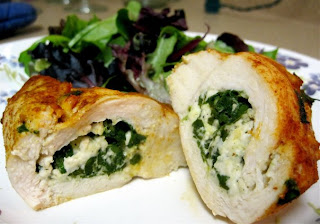
Something Old: Feta & Spinach Stuffed Chicken

Welcome to a very snowy Monday, at least in Columbus! There are only a few days left before Chase and I embark on our cross-country(ish) road trip to see as much family as possible for the holiday season. It's gonna be a doozy. (Which is a funny word).

In honor of all this snow, I'm revisiting the recipe that Bobbi and I made when we spend a day snowed (iced) in last year. The power had gone out in my apartment, and Bobbi was nice enough to let me crash and cook at her place. We made this stuffed chicken, and a cake since it was supposed to be the day of our joint birthday party, and we enjoyed a festive night in.

I originally found this recipe on Better Homes & Gardens, and made it with Chase one day when we were feeling ambitious. We made a few modifications as we went, and below is the recipe we came up with, the one Bobbi and I made together that snowy day.

Happy cooking!

-----------------------------------------------------------------------------------

Feta & Spinach Stuffed Chicken January 16, 2010


** Note: Requires marination time! **

Ingredients
3-4 chicken breasts
4 cups chopped spinach leaves
½ cup chopped onion
6 oz (¾ cup) feta cheese
2 Tbsp olive oil
2 tsp paprika
1 tsp salt
½ tsp pepper
¼ tsp cayenne pepper (optional)

Directions
1. Trim fat off the chicken breasts. Make a pocket in each, slicing the breast like you are making a pita. Do not cut all the way through to the other side!
2. In a bowl, combine the spinach, cheese, onion and black pepper. Spoon spinach mixture into pockets in the chicken.
3. Tie kitchen thread around each tenderloin to hold the stuffing. (I didn't have thread, so I used toothpicks to close the pockets.)
4. In a small bowl, combine oil, paprika, salt and cayenne. Brush the mixture over each chicken breast.
5. Wrap the breasts individually in plastic wrap. Refrigerate and let marinate for 4 to 24 hours.
6. Approximately 1 hours before you're ready to eat, preheat the oven to 375 degrees.
7. Unwrap the chicken and place in a shallow pan. Bake in the oven for 40 minutes.
8. Remove from the oven. Let chicken rest in the pan for 5-10 minutes. After it has rested, carefully slice the chicken to show the stuffing.
9. Serve and enjoy.

Making pita slices in the chicken.

Securing the stuffing by pulling the bottom chicken lip over the top and
toothpicking in place.

Pretty little marinade.

Marinade on the chicken. Ready for wrap and refrigeration.

Beautifully stuffed and baked. Happy cooking!

Thursday, December 9, 2010

Something New: Old Fashioned Bean Soup

Since it's been snowing for a straight week now in Columbus, I knew that this week's new recipe had to be soup. Mostly because I wanted to make soup. This recipe was the first to fall into my hands when I was flipping through the cookbooks, and while I had to wait 20 hours between starting time and eating time, it was worth it. Nothing was complicated. That's just the nature of soaking beans and running the crock pot.

My grandma made this for all the cousins when she'd have us over for game days. We could smell the soup cooking all day as we played cards (caddy!), and then near dinner time our parents would come over so they could eat soup too.

So this chilly week, stay in and eat soup!

Happy cooking!

-----------------------------------------------------------------------------------

Old Fashioned Bean Soup


Ingredients
1 lb dry navy beans
1 meaty ham bone (I used a 1.5 lb bone-in ham shank)
1 cup chopped onion
½ tsp salt
¼ tsp pepper
2 quarts (8 cups) water

Directions
1. Soak beans overnight according to package directions.
2. The next morning, drain and discard the soaking water (not the same thing as the 2 quarts water).
3. Combine all ingredients in a slow cooker. Cover.
4. Cook on high for about 8 hours.
5. Remove ham from cooker and debone. Shred the ham or cut to bite-sized pieces.
6. Stir the ham back into the soup. Serve.

Beans in a pot for their overnight soak.

Yes, this will turn into soup.

Ham off the bone (it fell off itself), waiting for shredding.

Delicious pile of slow-cooked shredded ham.

Happy cooking!

Monday, December 6, 2010

Something Old: Sweet Potato Fries

While at the grocery store the other day, my dad and I encountered the biggest sweet potatoes I've ever seen. They could have been used as footballs.

We refrained from doing that (I was tempted), but they reminded me that Chase and I haven't made sweet potato fries in far too long. We haven't made them yet, but I'm looking for a soup recipe to make this week and realized that these fries would be great served beside a cream-based soup. They're not just good for burgers and barbecue!

And since they're baked, not fried, they're good for you, right? ;)

Keep warm and keep cooking!

-----------------------------------------------------------------------------------

Sweet Potato Fries February 8, 2010


Ingredients
2 large sweet potatoes
1 tsp salt
1 tsp pepper
1 tsp cinnamon
4 Tbsp vegetable oil

Directions
1. Preheat the oven to 425 degrees.
2. Peel any large eyes from the potatoes. If you don't like skins on your fries, peel the whole potato.
3. Slice the potatoes into long wedges of about the same size. Sweet potatoes are hard, so use a large knife and be careful when cutting them.
4. Mix the oil and spices in a large mixing bowl.
5. Add about a third of the potato slices to the mixing bowl and toss carefully with a large spoon until the slices are covered. Move the slices to a cookie sheet that has been coated with cooking spray.
6. Repeat with the rest of the potatoes. Make sure the slices are not touching on the cookie sheet, using two sheets if necessary (both sheets can go in the oven at the same time).
7. Bake for 25-30 minutes, turning the potato slices halfway through cooking.
8. Remove from oven and sprinkle with extra salt while still hot. Serve and enjoy.

Thursday, December 2, 2010

Something New: Husband's Delight

Welcome to December, food friends!

Here in Columbus, the weather greeted us appropriately with a dusting of snow on the first day of this cheerful month. When I opened the door yesterday morning and saw it, I let out an audible gasp (to Chase's amusement). What can I say? I like snow.

I wish I had a convenient link between snow and this recipe, but there really isn't one. Still, this is a great recipe that I got from my grandma. Chase is scared of cottage cheese, but he loved this dish. Considering that last week he declared that Jumbo Cookies are perhaps his new favorite cookie, I'd say that my grandma has a recipe fan.

ps- My grandma and I have no idea where the recipe got it's goofy name. But my grandpa loved it when my grandma made it, so I suppose it's still fitting.

Happy Thursday cooking!

-----------------------------------------------------------------------------------

Husband's Delight


Ingredients
1 (8 oz) package medium egg noodles
1 ½ lbs lean ground beef
3 (8 oz) cans tomato sauce
1 cup cottage cheese
8 oz cream cheese
¼ cup sour cream
1 cup shredded cheddar cheese
¼ cup chopped onion
¼ cup chopped green bell pepper
1 clove garlic, minced
1 Tbsp butter
1 Tbsp sugar
Salt & pepper to taste

Directions
1. Preheat the oven to 350 degrees.
2. Cook noodles according to package directions.
3. Meanwhile, brown ground beef. Brown garlic and onion in the butter in a separate skillet.
4. Mix garlic, onion, tomato sauce, salt, pepper and sugar into the beef skillet.
5. In a mixing bowl, combine cottage cheese, cream cheese, sour cream, and green peppers.
6. In a greased 9x13 pan, start with a layer of half the noodles. Top with the cheese mixture, then the rest of the noodles.
7. Finally, cover with the beef mixture and top the whole thing with the shredded cheddar.
8. Bake for 30 minutes in the oven.
9. Serve and enjoy.

Beautiful beef sauce.

A house divided. I don't like bell peppers, but Chase does. The solution was simple.

Ready for the oven.

Beefy cheesy noodley goodness.

Happy cooking!

Monday, November 29, 2010

Something Old: Hearty Lentil Soup

Now that the turkey dust has settled, it's time for something quite different but just as savory. This is a recipe my mom made every winter, and one Chase and I have adopted into our rep.

My favorite memory of this recipe was when Chase and I drove into Duncan to visit his Mema and Pa, and we made this soup for them. They loved it, and I'm pretty sure it was all gone by the next day.

Oh, and there's a crock pot version for slow cooker fans!

Happy cooking!

-----------------------------------------------------------------------------------

Hearty Lentil Soup September 26, 2010


Ingredients
6 slices bacon
1 pound (1 package) little smokies
1 cup dried lentils
1 28-oz can diced tomatoes
¼ cup diced onions
1 cup chopped carrots
¼ cup chopped celery (optional)
1 bay leaf
tsp garlic powder
¼ tsp pepper

Directions (Stove top)
1. Wash lentils, removing any that are shriveled
2. Put lentils in a pot with 3 cups of water. Add onion, celery, carrots, garlic, pepper and bay leaf. Bring the whole thing to a boil.
3. Reduce heat and simmer covered for an hour. Stir every 15 minutes or so, adding more water as needed to keep the lentils covered.
4. Meanwhile, cook the bacon and cut into small pieces. Cut the smokies into thirds or quarters.
5. After an hour, check to see that the lentils and carrots are cooked through. If so, add the smokies, bacon and tomatoes.
6. Cook for another 15-30 minutes, until the smokies are warmed through.
7. Serve.

Directions (Crock pot)
1. Wash lentils, removing any that are shriveled.
2. Put lentils, onion, celery, carrots, garlic, pepper and bay leaf into the crock pot with 2 cups of water. Cook on high for an hour.
3. Reduce to low and cook for 5-7 hours.
4. About 30 minutes before serving, add tomatoes, smokies and cooked bacon. Continue to cook on low.
5. Serve.

All the ingredients you'll need (unless you like celery).

The first time Chase and I made this together was on a Sunday dinner Skype date.

Veggies and spices, ready to boil.

Last bit of simmering then ready to bowl.

Happy cooking!

Thursday, November 25, 2010

Tuesday, November 23, 2010

Something Old: Pumpkin Muffins

Just in case you're not going to get enough pumpkin in the next week, or in case you're searching for a last minute recipe to take to the family gathering, here's a great recipe for you.

This recipe works as a dessert recipe too! Spread cream cheese frosting on the tops and dust with cinnamon sugar, and you're good to go.

Happy holiday cooking!

-----------------------------------------------------------------------------------

Pumpkin Muffins November 6, 2009


It’s time for fall things! Sweaters, essays, soup and sniffles. But most importantly, it’s time for pumpkin baked goods!

The other day I started craving anything pumpkin, so I went searching for a recipe for pumpkin muffins. I found a few and decided to combine a few to make just I wanted.

After tweaking (brown sugar was a must!) and playing around, this is what I made:

Ingredients
3 cups flour
2 tsp baking powder
1 tsp baking soda
2 cups canned pumpkin, unflavored
cup veggie oil
2 tsp McCormick pumpkin-pie spice
1 ¼ cup white sugar
1 ¼ cup packed brown sugar
1 tsp salt
Topping:
3 tsp cinnamon
3 tsp sugar

Directions
1. Preheat oven to 350 degrees and put paper liners in muffin tin.
2. Mix flour and baking powder in a small bowl.
3. In a large bowl, mix pumpkin, oil, eggs, pumpkin pie spice, sugar, brown sugar, baking soda and salt.
4. Once that is mixed, carefully add flour mixture until combined.
5. In a separate bowl, combine the topping ingredients.
6. Fill the muffin cups about 2/3 full, then sprinkle with half of the cinnamon sugar topping.
7. Bake for 25-30 minutes, until an inserted toothpick comes out clean.
8. Sprinkle the remaining topping over the muffins. Let cool and enjoy!